Two images are often easier to send as one document: an overview first, then a close-up. In Edit PDF Pages, each JPG or PNG becomes a separate PDF page. You choose the order and page layout before creating the document.
Use Tools → Images to PDF to start a new document. To add images to a PDF that is already open, use the + button beside Pages. That second route can accept PDF files and images together, so a written report can be followed by its supporting pictures.
Turn two images into a short document
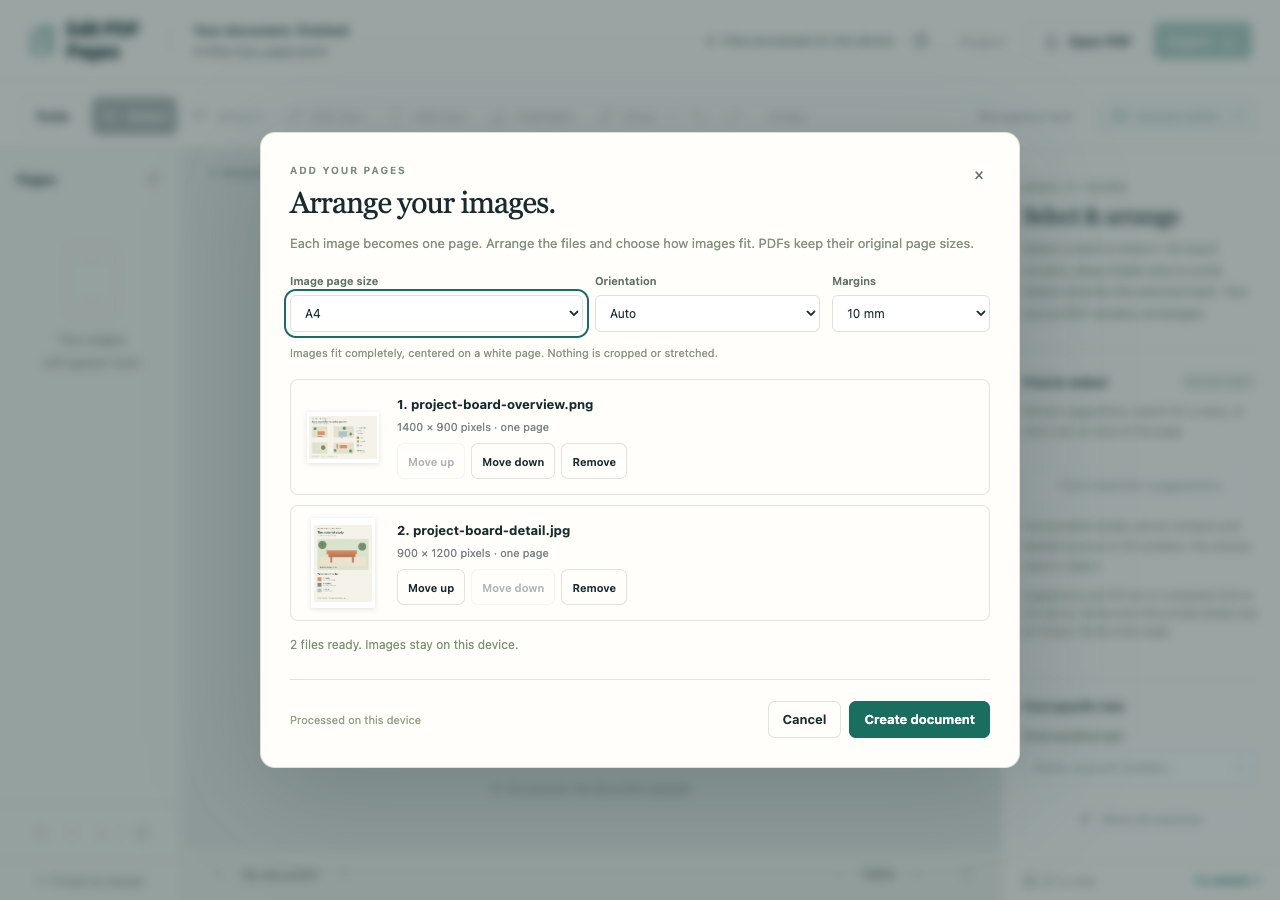
- Choose Tools → Images to PDF and select both images. The Arrange your images. dialog shows a preview and filename for each one.
- Put the overview first and the detail second with Move up or Move down. File-picker order can differ from the order you want the reader to see.
- Set Image page size to A4, Orientation to Auto, and Margins to 10 mm. Check the image previews and filenames.
- Choose Create document. In the workspace, inspect both pages and confirm that the complete images are visible.
- Choose Export, select PDF, and leave Pages on All pages. Use Preserve PDF structure, then Create PDF.
Open the download and check its two pages in order. Look at small writing and the outer edges of each image, not just the thumbnails. The original JPG and PNG files on your device remain separate from this new PDF.
Choose a page shape that suits the pictures
Match image · 11-inch long edge makes each page follow its image's proportions, without margins. A wide image makes a wide page; a tall image makes a tall page. This setting controls the physical page size, not the amount of detail captured in the original picture.
A4 and Letter give you familiar paper sizes. With Auto, orientation follows each image. Choose Portrait or Landscape when you want a consistent page orientation, then choose no margin, 10 mm or 20 mm.
Images fit completely inside the available area. White space is expected when the image and page have different proportions. Edit PDF Pages centers the image rather than cutting off its edges or stretching it to fill the sheet. A larger margin leaves less room for the image, so small labels may be harder to read.
Add pictures to an existing PDF
Open the PDF, choose the Pages + button, and select the files to append. In a mixed selection, the layout settings apply to the image pages; existing PDF pages keep their original sizes. Arrange the files, remove any you do not want, then choose Add pages.
The staging dialog gives you a chance to cancel before the workspace changes. If an image cannot be read or exceeds the input limits, remove it from the list before continuing. JPG and PNG inputs are limited to 10 MB and 24 megapixels per image.
Text in a picture stays a picture
Putting a photograph or screenshot inside a PDF does not turn its lettering into selectable text. If the images contain readable English text and search would help, follow the OCR guide after creating the document. Check recognized words against the pictures, especially names and numbers.
For a finished presentation or report, keep enough source detail for the intended viewing size. Increasing the PDF page size cannot restore detail that was missing from a small or blurred original.