A slide deck, web form or message may need a picture of a PDF page. Exporting that page as an image gives you its full visible appearance, including annotations and edits, in a file you can insert elsewhere.
Edit PDF Pages exports whole pages. If you want a photograph or diagram on its own, this tool will also include the rest of that page. It does not extract the original embedded picture as a separate asset.
Start with PNG, or choose JPG for photographic pages
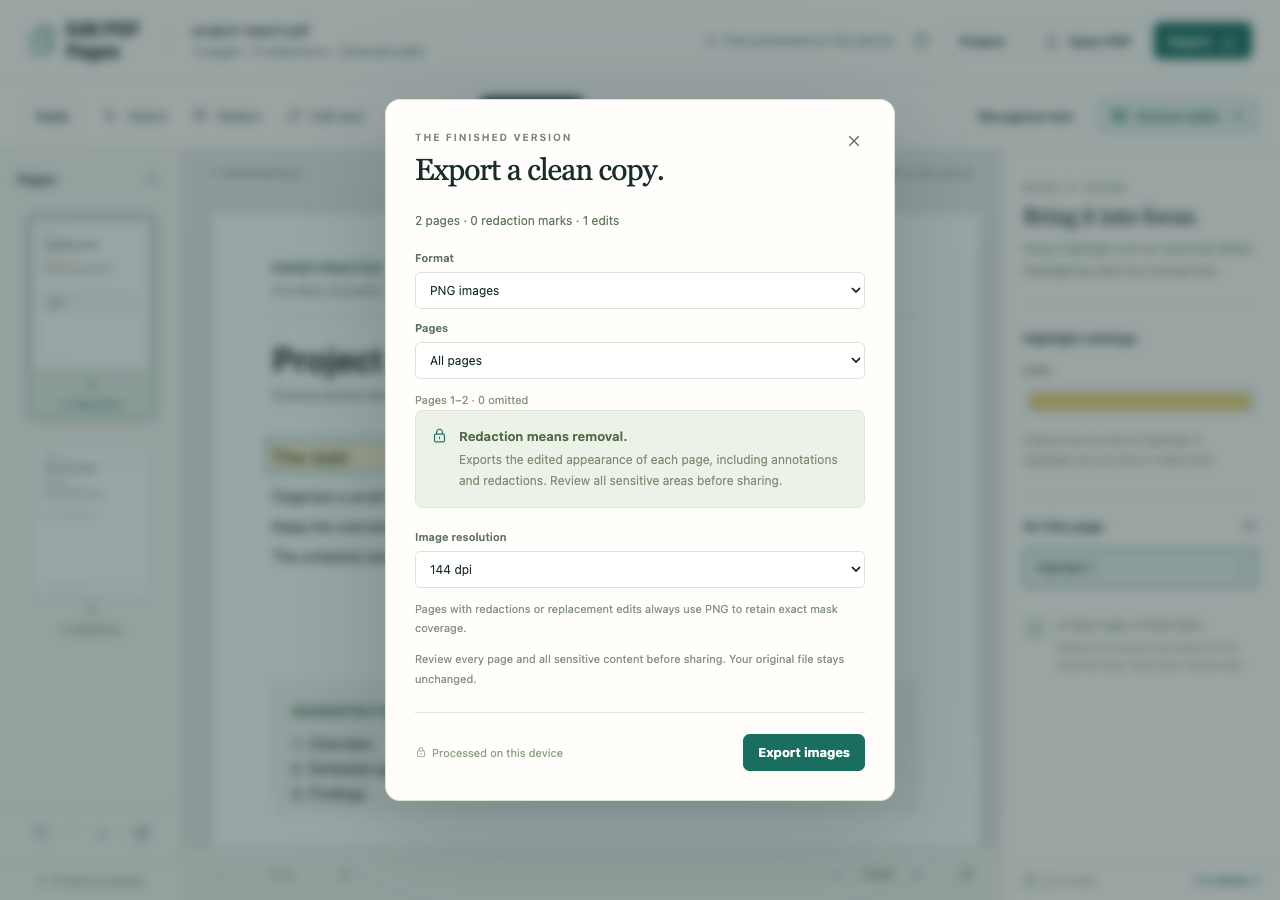
PNG images is the default. PNG keeps the rendered pixels without JPEG compression, making it a useful starting point for small text, line drawings and screenshots. JPG images · 90% quality applies JPEG compression, which can suit photographic pages but may soften fine lines and text edges.
Whichever format you choose, the output is a page image. PDF text is no longer selectable, links cannot be clicked, and form fields cannot be filled in that image. If the recipient needs a working PDF with those features, extract the page as a PDF instead.
Export a two-page report
Download the fictional project report and open it in the workspace. Its Overview and Findings pages make it easy to recognize the downloaded images.
- On page 1, choose Highlight and drag across the The task heading. This gives you an edit to check in the exported picture.
- Choose Tools → PDF to images. This opens the export dialog with PNG images selected.
- Leave Pages on All pages and set Image resolution to 144 dpi.
- Choose Export images. After the pages are created and checked, a ZIP downloads.
- Unzip it and open both image files. The numbered filenames follow workspace page order: Overview first, Findings second. Check that the highlight is visible on the first image.
For just one picture, select the page in the workspace before opening export, then set Pages to Current page. A single result downloads directly as an image. You can also choose Range and enter page positions such as 1–3, 7; the preview below the field shows the selection.
Pick the resolution for where the image will go
The choices are 72, 144 and 216 dpi. On the same page, 144 dpi produces about twice as many pixels across and down as 72 dpi. Higher resolution can make small text clearer when the image is viewed large, but also creates more pixels to process and a potentially larger file.
Try 144 dpi first, then inspect the image at the size you will actually use. Choose 216 dpi if fine details need more room; 72 dpi can be enough for a small preview. A blurry source scan remains blurry when enlarged.
Large page selections at high resolution may exceed the export limit. Choose fewer pages or a lower resolution and try again. You can cancel an export in progress; Edit PDF Pages waits until the full selection has been checked before downloading the result.
Review edits and covered areas in the image
Exports include the current edited appearance: highlights, added text, inserted images, redactions and replacement text. Check the downloaded image rather than relying on the workspace preview, especially if an edit sits close to other content.
A page with redactions or replacement edits always exports as PNG, even when JPG is selected. This preserves the exact pixels of the covered areas. A multi-page ZIP can therefore contain both JPG and PNG files. The export status reports when marked pages used PNG.
Changing format cannot decide whether you covered every private detail. Review names, identifiers, margins and the edges of all marks before sharing. Keep the original document and any editable project separate from the images you intend to send.